myWerkzeug.de › CNC.myWerkzeug.de › Templates › Games
CNC template · Games
Hand spinner with ball bearing
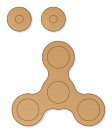
A spinner for your hand: a ball bearing runs in the middle, further bearings in the arms act as flywheel weights. Two finger caps on a dowel. Number of arms, bearing size and fit adjustable; default skateboard bearing 608.
- Size
- 120 × 154 mm, 8 mm thick
- Material
- Hardwood (beech, oak)
- Difficulty
- Intermediate
- Milling time
- approx. 8 min
- Bits
- End mill Ø 3.175 mm
- Customise
- Size, text and details adjustable with sliders
- With a laser
- diode laser from about 24 W (cuts 8 mm)
Free with an account · carve with Chrome or Edge · no installation
Build instructions
Materials and accessories
| Qty | Part |
|---|---|
| 4 | Deep groove ball bearing (bore × outer diameter × width) 8 × 22 × 7 mm (608) |
| 1 | Beech dowel rod 8 mm |
| 2 | Washers to fit the bearing bore M8 |
| 1 | Wood glue (water-resistant D3) |
Also: sandpaper (grit 120 and 240), a utility knife or fine saw and, for joints, a rubber mallet.
Carving and finishing
- Clamp the workpiece flat on the spoilboard or secure it with double-sided tape, and set the origin as shown in the carving assistant.
- First mill a test piece with one bearing seat and press the bearing in: it should go in with your thumb or a clamp and then sit firmly. Too tight: increase the fit by 0.02 mm; too loose: decrease it.
- Mill the bearing seats and cap holes, then cut out the spinner and both finger caps.
- Free the parts at the holding tabs with a utility knife or fine saw and sand the tab remains flush.
Assembly and final touches
- Press the bearings into the seats from above (ideally with a clamp and two small boards) until they are flush.
- Saw a piece of dowel as long as the bearing width plus two caps, push it through the centre bearing and glue the caps on. Put a thin washer between each cap and the bearing so the caps only touch the inner ring.
- Hold it between thumb and middle finger and flick it: it spins long and smoothly when all arms weigh the same.
How to carve this template
- OpenOpen the template in the app and adjust size and text if you like.
- CheckLook at it in 3D, check run time and warnings.
- Set upThe carve wizard guides you through material, clamping, bit and zero point.
- CarvePress start; the app drives your Grbl router directly over USB.